Watering African Violets
By Sandra Skalski
Seasoned growers will tell you that proper watering is one of the most important skills you will learn in growing African violets. In fact, overwatering may be the number one cause of violet demise. The good news is there are many good ways to water African violets, and this is an easy skill to learn.
WATER QUALITY
In most locations, tap water will be fine, but the quality of tap water can vary. Chlorine levels may fluctuate, depending on the season. In some areas, tap water may have high amounts of chlorine, chloramines, or dissolved solids. All these things may adversely affect your African violets. Your water supply company can give you information on water quality, or you may have your water independently tested. In general, it is a good idea to fill a jug with water and let it sit overnight to let any chlorine dissipate. You may also use bottled water, filtered water, or reverse osmosis water. Water from a water softener may contain dissolved salts, and this will be a problem for your African violets.
Many growers use rainwater, with good results. While rainwater is generally free from some of the common contaminants in tap water, like chlorine and chloramines, it can acquire contaminants during collection. For example, roof runoff may contain pollen, roofing chemicals and bird droppings. Be sure the water you collect is clean and free from particulates and other contaminants.
It is a good idea to test your water pH periodically. Tap water can fluctuate with the seasons, since chlorine and chloramines levels tend to be higher in the warmer months. If your pH is outside the ideal range for African violets (6.5-7.5), you may adjust it using pH up or down products which are sold in aquarium or hydroponics stores. These stores also sell products that reduce or eliminate chlorine and chloramines.
Many growers will add their liquid or granular fertilizer to a jug of water and then use that solution to water their plants. The fertilizer is used at a low strength so that there is a low but constant level of fertilizer for consistent blooming and growth. For example, if the directions say to use 1/4 teaspoon per gallon per week, use 1/8 teaspoon.
TOP or BOTTOM WATERING
Casual growers (or growers with smaller collections) commonly use top or bottom watering. Water the plants either from the top or the bottom when the top half inch of the soil is somewhat dry. Put your finger in the top of the soil to test for dryness or lift the pot to feel the weight (pots with dry soil feel lighter than those with moist soil).
A dish or saucer is used under the pot to catch drainage. To water from the top, pour the water through the soil, taking care to keep water off the leaves. To water from the bottom, add the water directly to the saucer. When watering from the bottom, it may take a couple hours for the plant to absorb the water up to the top of the pot. In either case, pour off any water remaining in the saucer after a few hours.
Advantages:
- There is little preparation involved, other than having a saucer available.
- You can check each individual plant to identify its exact water needs.
- Thorough top watering helps force out excess salts in the soil (via the drain water). This is called leaching and it promotes healthier roots.
Disadvantages:
- Can be time consuming, especially if you have a lot of plants.
- Vacation watering can be a problem.
- It is easy to over-water plants which can lead to root rot.
If the plants become very dry or wilt, do not flood the plant with water right away. A dry root system cannot absorb water; the roots need time to “plump up” before they are able to draw water again. Just add a tablespoon of water on top of the soil, and then repeat every hour or so until the soil is fully moist and the roots are ready to function again. It may help to place the plant in a plastic bag to provide extra humidity to help it recover.
If the plant is limp but the soil is very wet, act quickly. Place the plant on a wad of paper towels or folded newspapers to help draw out the extra water. You may lose the outer rows of leaves, but, if the center survives, the plant will be saved.
WICK WATERING
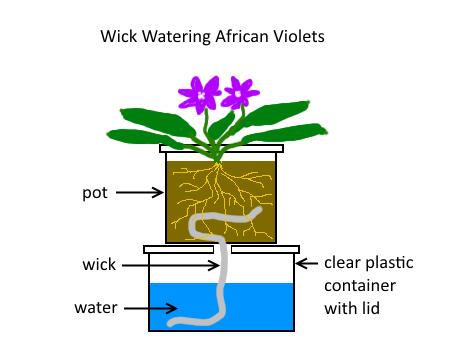
Wick watering is a convenient way to water violets, especially if you have a large collection. Before you begin wick-watering, be certain that you have the correct pot size and potting mix, or you may end up with rotted plants because the soil was too wet.
The potting mix must be very porous so that there is plenty of air around the roots even when the mix is wet. Use a potting mix that is at least fifty percent coarse perlite. Growers with high humidity may need more perlite to get adequate porosity. If you buy your potting mix, look for words like ‘wicking mix’ as an indication that the mix is suitable for this type of watering.
The potting mix should be moistened before you begin potting your violet, or the wicking process may not function properly. The wick should be 6 to 8 inches long (for a 4” pot) and must be a synthetic material such as acrylic, rayon, strips of old pantyhose, nylon yarn or cording. Wick watering takes advantage of capillary action to pull water through your plants.
Insert a wet wick when repotting by stringing it through the drainage hole in the pot and up to the top rim, then adding potting mix and the violet. Alternatively, you may put the wick in after potting by using a hook such as stiff wire, a crochet hook or a long darning needle. Push the straight end of the tool into a hole on the bottom of the pot, catch the wicking material in the hook, and pull on the tool at the top of the pot to bring it on through. Be careful not to puncture any leaves.
The wick should dangle out of the bottom of the pot and into a reservoir of water below. The pot itself should not contact the fertilizer water.
The reservoir may be as simple as a plastic food container, or recycled glass jars. Make two holes in the cover – one for the wick and the other big enough to add more water to the reservoir (so that you do not have to remove the top).
Some people wick water with a community reservoir for many plants, such as a large water-filled tray with “egg crating” laid on top. Egg crating, which is used to diffuse fluorescent light fixtures, may be found in hardware stores or online. A community reservoir is convenient — you must fill only one reservoir instead of many. But there is a significant downside. Pests like soil mealybugs and some fungi (phytophthora and rhizoctonia) can spread from one plant to all the others on the same community watering system.
Advantages:
- Less time consuming than watering individual plants.
- Large reservoirs can keep the plants watered for weeks; no vacation watering issues.
Disadvantages:
- Algae often grows in the reservoir. To resolve, line the reservoir with a sheet of plastic which extends over the sides of the reservoir. You can throw out the plastic when it turns green instead of washing out the whole reservoir. Or, add one tablespoon of 3% hydrogen peroxide to a gallon of fertilized water to prevent algae growth.
- The plant may not soak up the water. To resolve, pour water through the top of the pot to try to get the capillary action going. If the pot is broad and shallow (such as for trailing violets,) two or three wicks may be needed.
- The plant may become too wet. In that case, repot with potting mix which contains more perlite.
MAT WATERING
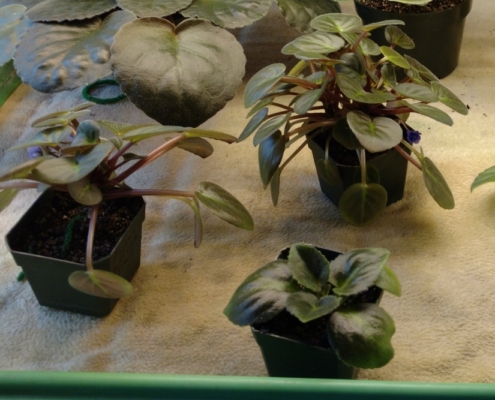
Mat watering is similar to wick watering. Plants are placed on a damp absorbent mat. You can place pots directly on the mat, but some people use wicks in those pots to be sure there is contact with the mat. Both the wick and the mat material must be synthetic. Old (or cheap) blankets or synthetic felt or fleece may be cut to size for the mat. Add water to the tray on a regular schedule, just enough to keep the mat moist. Use a porous soil mix like that used for wick watering. Mat watering works very well for small plants.
Some growers lay their matting over plastic egg-crating, which is elevated above the water. The egg-crating is cut to sit on the rims of the tray. The matting is cut and laid on the crating with one or more “tails” dangling on the side into the tray of water below. These tails will wick water and keep the matting moist for a longer time. The matting must be fully moist for the wicking action to work properly.
Advantages:
- Fewer reservoirs to fill, compared to individual wick watering.
Disadvantages:
- The mat may dry out very quickly.
- If the shelf is not level, some of the plants may not get enough water.
- Pests and diseases, such as soil mealybugs and some fungi such as phytophthora (crown rot) can spread very quickly through community watering.
Last Updated 2020


